
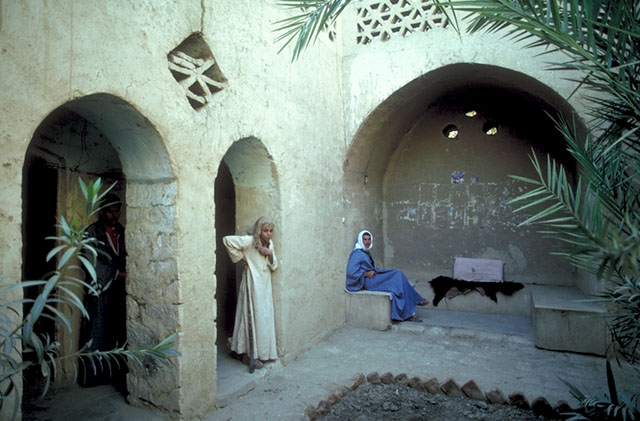
Aga Khan Trust for Culture, CC BY-NC 4.0
During an era in which the International Style was on the rise, the Egyptian architect Hassan Fathy (1900–1989) popularized the use of traditional materials and structures in countries with hot, arid climates. In an effort to make housing more affordable for the poor, Fathy optimized construction technologies and trained local residents to build their own homes. This text is a part of his educational project, written by Fathi in 1984 with the help of Salma Samar Damluji, a professor from the Faculty of Engineering and Architecture at the American University of Beirut.
A universal prevalence of unsatisfactory housing conditions has become a dominant trait in our epoch. While much praiseworthy attention is being given to this problem, it seems almost intractable due to the low income of the people to be housed.
United Nations Organization (UNO) estimates show that the annual income per capita in the developing world is between UK£20 and UK£30. Surveys carried out some 15 years ago show that 800 million people were doomed to a premature death due to bad housing conditions, not to mention poor nutrition. This figure will have surpassed the billion mark by now.
Despite the huge efforts expended on housing for the poor, sadly most of these founder on the rocks of the high cost of building relative to the low income of the people to be housed — or what their governments can afford to give them in cash loans. In order to reduce costs, UNO fostered a system known as “aided self-help,” providing peasants with concrete mixers and vibrators for the construction of prefabricated building elements. But even this failed to bring the overall cost down to the level of the financial capacity of the people to be aided. As a matter of fact, the problem of cost lies in the materials to be mixed and vibrated and not in the labor, which the peasants can themselves provide. After some ten years of trial and error, the organizations working there, including the UNO, admitted the unworkability of this scheme—as stated in a report by the ECA (Economic Commission for Africa), from which I quote:
But the fact is a practically insurmountable obstacle where the policy is that housing must normally be paid for. Between the limits imposed by the financial profitability of buildings and the solvency of the occupants, the few thousand dwellings built in all Africa are finally inhabited by the privileged minority of the country. The rest of the population continues to swell in the shanty towns of the suburbs. It is without doubt time to say that there is no chance of finding a satisfactory technical or financial solution to this situation before the African states have attained a certain level of economic development. But in practice this technique is left to peasants in limited regions, namely Nubia, the province of Aswan and central Iran.
Fortunately, there are technical and economical solutions that can be applied immediately without waiting for the development of the continent’s economy. Traditional methods of building using local materials such as stone and mud should be reverted to and the use of costly industrialized materials avoided.
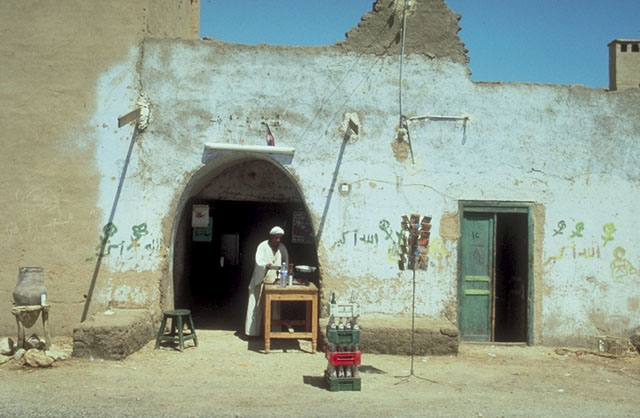
A survey carried out in 1950 by the Ministry of Social Affairs in seven villages in Lower Egypt and seven in Upper Egypt showed that 54.4 per cent of all the rooms in all the houses were roofed with palm frond branches and reeds, with a further 27.5 per cent having no roof at all. This indicates that peasants are able to build walls, but are often defeated by the construction of the roof, and this is the heart of the problem [to which] we must turn our attention.
Generally speaking, ordinary flat roofs should be constructed of materials that take up bending and tensile stresses, such as wood, steel, reinforced concrete, etc., but these materials have to be paid for in cash. It is therefore imperative to find an alternative approach to the concept of roofing for the large majority.
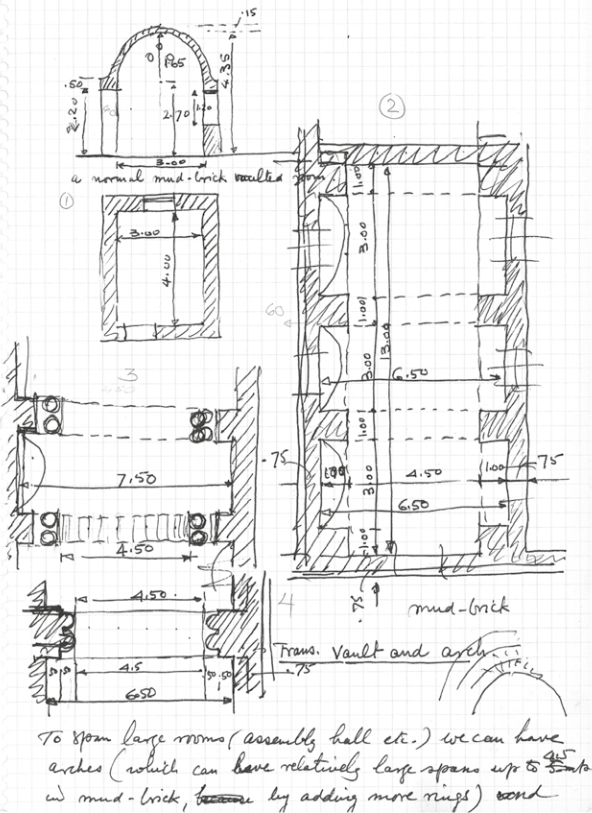
Right: Study by Hassan Fathy showing how to span large areas by adding transversal vaults.
The Ancient Egyptians devised an ingenious method for roofing employing mud-brick parabolic vaults and spherical domes, thus solving the problem of the resistance of materials and the stresses generated by the geometrical form. They constructed roofs in the shape of a barrel vault with the profile of a catenary curve in which the tensile stresses are annulled and in which the shell is exposed to compressive stresses allowing for the safe use of mud brick. Moreover, they devised a simple method for the construction of vaults, right out in space without the need for centering or support during construction. This they achieved by building the vaults in the form of the catenary curve in successive rings, with the bricks laid end to end in a plane slightly inclined to the vertical and leaning against an end wall.
In this way and with an unlimited supply of free material, the peasant can build his own house in mud brick. If we are to revive this system of vaulting we need to subject it to the findings of the modern sciences of soil mechanics and shell structures, and the practicing architect must be acquainted with the potential inherent in these methods of construction and the impact they have on the architectural design both technically and aesthetically.
Although we are concerned with the vaulted roofing of modest dwellings for large numbers mainly in mud brick, it should be added that man has contrived to develop the techniques of vaulting in other materials such as burnt brick and stone, from ancient times, as witnessed in Assyrian, Babylonian, Sassanid [Sasanian], Pharaonic, Roman, Romanesque, Gothic, and Byzantine architecture. These forms have fallen into disuse because of the facilities offered by modern materials and techniques such as concrete and steel. However, the idea of using geometrical forms in order to provide the necessary resistance is applied in the roofing of great spans by concrete shell structures.
The concept of the parabolic vault
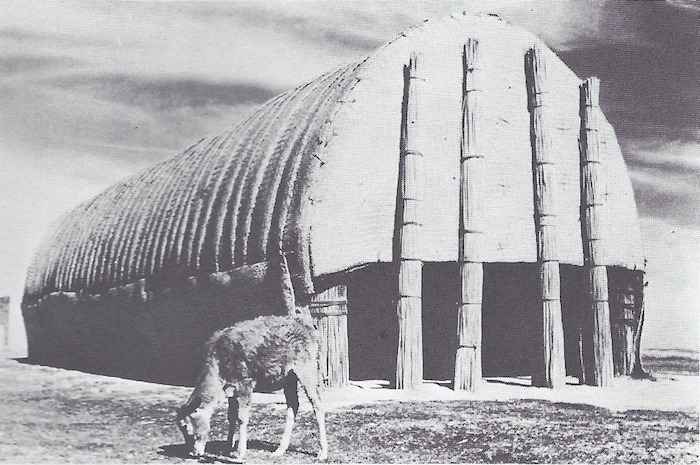
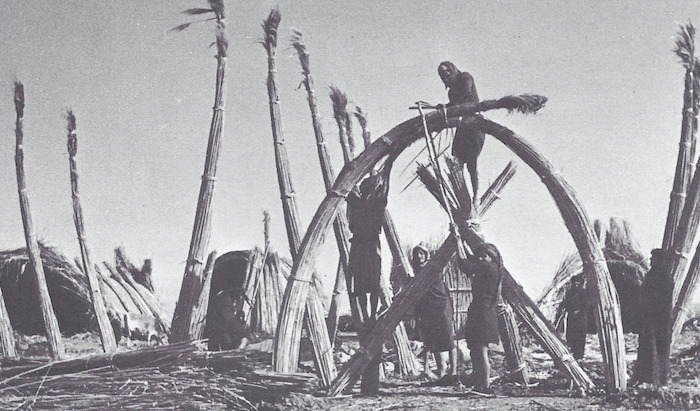
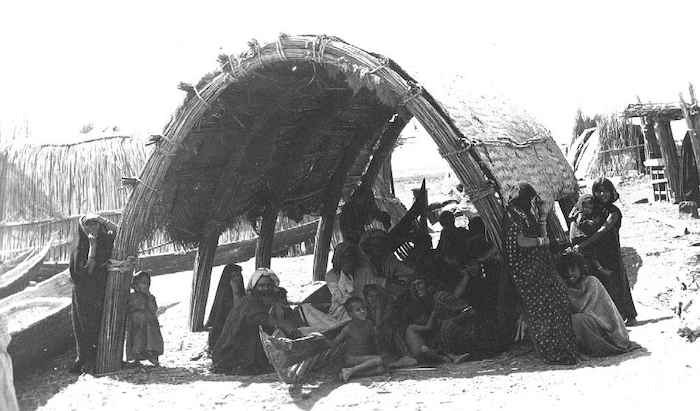
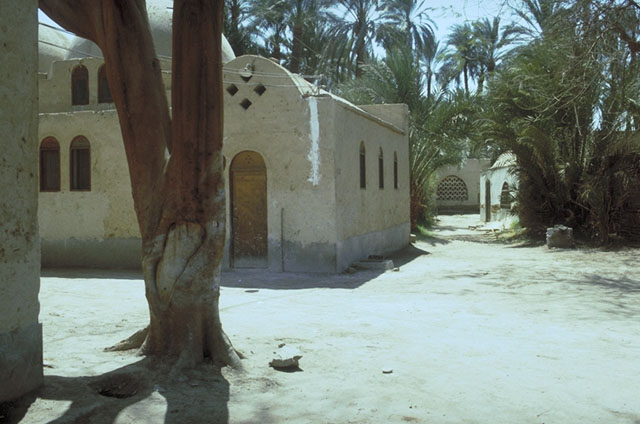
There is evidence to suggest that the concept of the parabolic vault in roofing was inspired by the use of reed structures as found in the marsh areas of southern Iraq. There, reeds grow in abundance. An example of reed architecture developed by the marsh Arabs can be seen [overleaf ]. This example is composed of two side walls tied together in bundles and bent at the top to form the roof; two end walls complete the room. The bent reeds take the parabolic form naturally, giving the structure the rigidity of an egg shell. A similar example of this combination, but in mud brick, can be seen in the village of Fāris in Upper Egypt. This is almost an identical transposition of the reed structure, with the side walls, the vaulted roof and the end wall, all of which strongly suggest a reed origin. The similarity is so striking that it cannot have arisen by chance; the reed vault has not been seen in Egypt since ancient times, suggesting that there must have been a reed prototype leading to the brick model.
Bernard Rudofsky. Architecture Without Architects: A Short Introduction to Non-Pedigreed Architecture (1964)
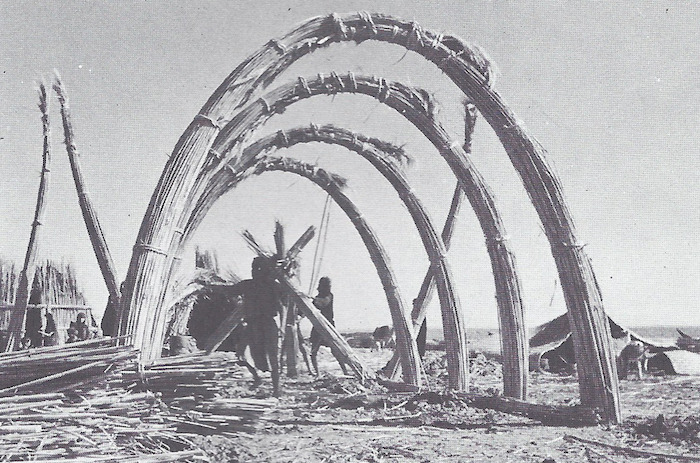
Further evidence as to the reed origin of the vault is to be found in the roofing of a large hall in the Marshes, Iraq, in which bundles of reeds are bent to form the ribs of a parabolic vault. Again, the same form is found in the roofing of one of the Pharaonic tombs dating from the 6th Dynasty (excavated at Giza necropolis by Dr. Abdel Monem Abu Bakr in 1949–1950). This tomb has a mud-brick ribbed catenary vault built in the shape of the reed structure. In this model the ribs are painted red, the Pharaonic color symbolizing wood. A similarity can also be seen in the façade of the above-mentioned reed hall in Iraq and the stone façade of the Hepshed hall of the Zoser temple at Saqqara, designed by Imhotep in the 3rd Dynasty.
This technique of vaulting without recourse to centering has also been employed throughout central Iran, not only for roofing humble houses in mud brick as in Yazd and Kerman, but also for mosques, palaces, public baths, etc. with highly sophisticated vaulted roofing in baked brick.
In this way and with an unlimited supply of free material, the peasant can build his own house in mud brick
The same technique of vaulting in mud brick has been discovered in historical examples, some of which date back to the 3rd Dynasty, for example in the excavations in Deir Khalaf in Menia and the Ramesseum of the 18th Dynasty in Gourna and the monastery of St. Simeon in Aswan of the 12th century CE. Here, the lobby has an interesting feature in that the vault carries a top floor by having small side vaults on top to avoid the filling between the vault and the horizontal floor on top. In the hall of the Ctesiphon Palace in Iraq baked bricks were used to construct a vault 25.5 meters [84 feet] wide and 37 meters [120 feet] high.
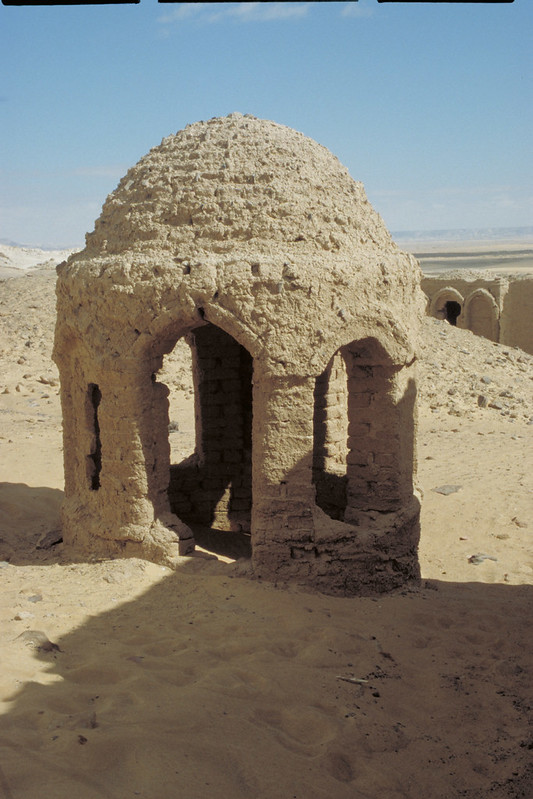
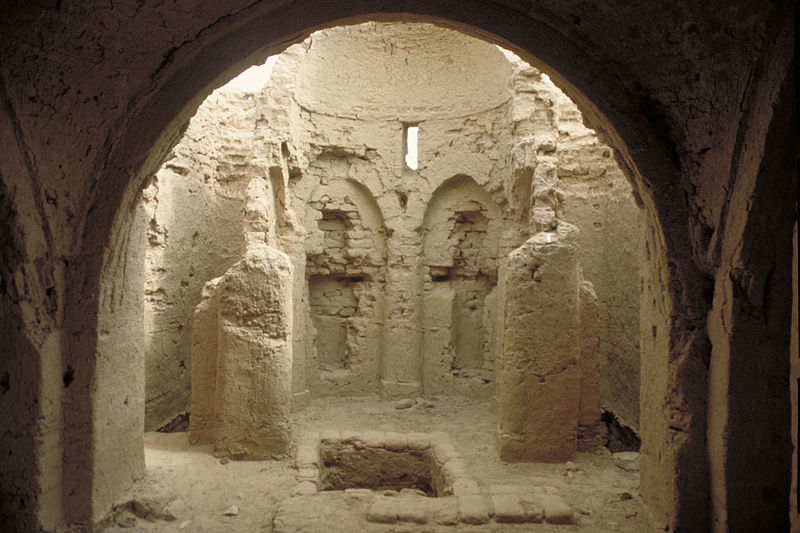
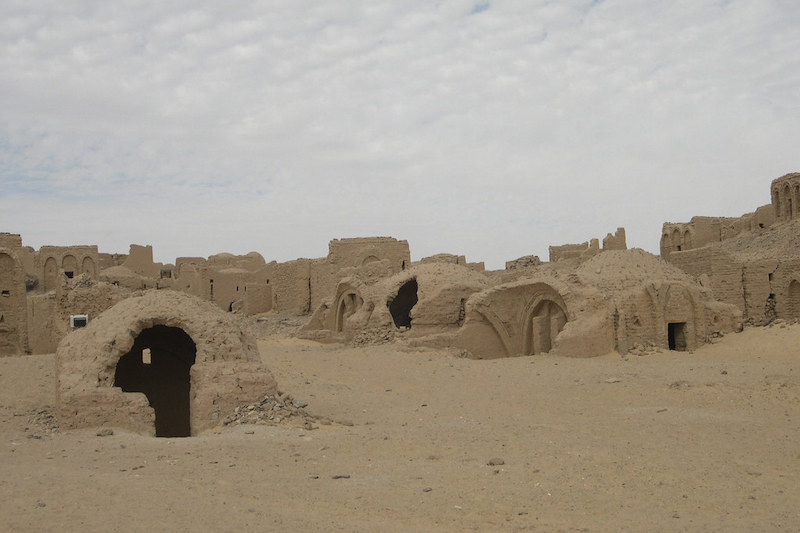
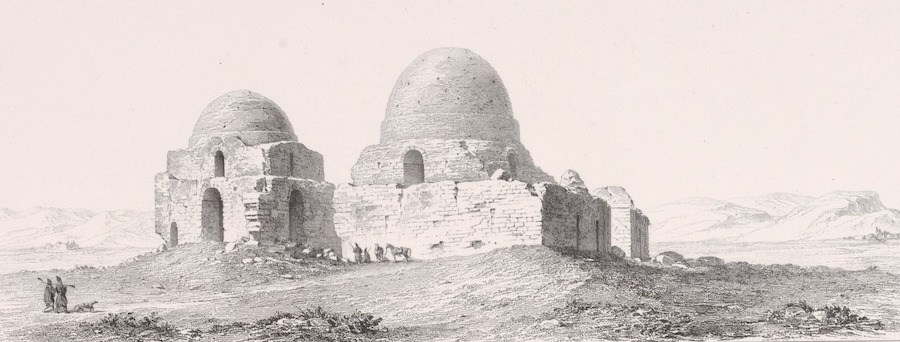
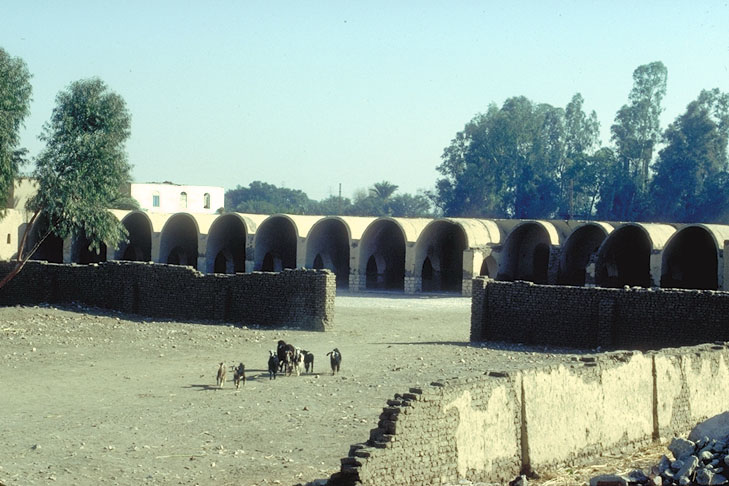
In the village of Bagawat in the al-Kharga Oasis a colony of 250 dwellings was established with churches and tombs dating from the 4th century, built by Christians who fled the Romans and came empty-handed to Kharga. They built their shelters using the materials they found on site, namely silt and stone, incorporating vaulted roofs in mud brick built without centering. The solution to the problem of roofing by means of vaults and domes was a structural feat, particularly since they employed a combination of the two elements to cover large spaces without increases in height.

Institute for the Study of the Ancient World
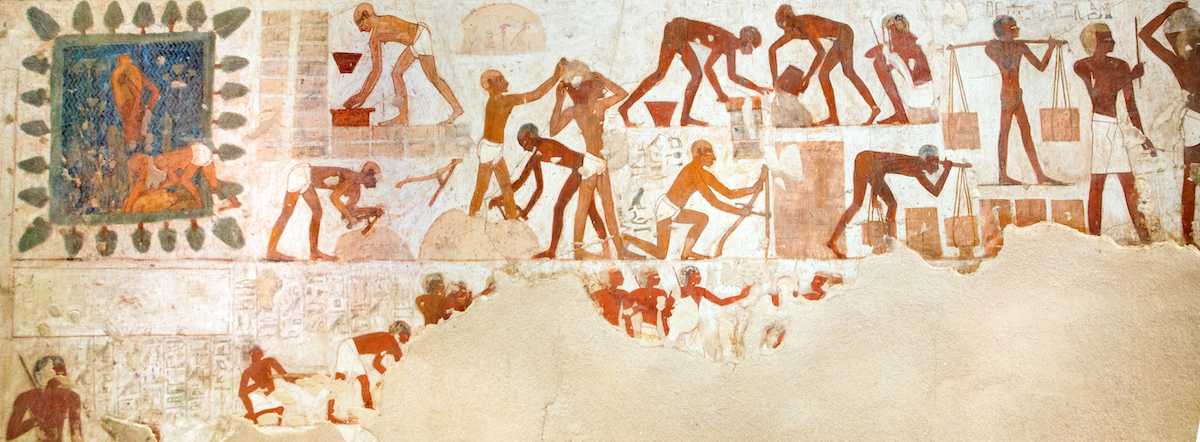
Mud bricks have been used widely in hot, dry areas of the East for over 4,000 years. The techniques of building vaults and domes, pendentives and arches, were perfectly familiar to the Egyptians in the 12th Dynasty. The earliest prominent example is the Granaries of the Ramesseum in Luxor, long narrow vaulted rooms, built of mud brick some 3,300 years ago.
Darius, when talking of the foundation of Susa, describes the building of the palace, and gives the Babylonians the credit for molding the sun-dried bricks: “The men who wrought the baked bricks these were the Babylonians”Babylonians”Wulff, H.E., The Traditional Crafts of Persia, MIT Press, 1966, p. 103 .
.
At that time stone (used for foundations) and timber (which served for roofing) were brought from Lebanon and widely used. Yet with the growing scarcity of timber for building, the vaulting technique was developed, which permits the roofing of buildings without wooden beams.
During the Parthian and Sasanian periods, vaulting achieved high technical and architectural values. There were two basic forms:
— The barrel vault to cover rectangular rooms.
— The dome over a square room, as for the transition from the square base to the circular dome the builder invented squinches and pendentives.
Thus the 4th millennium brought the gradual replacement of partly dug-in caves and houses and partly built rammed-earth houses, by sundried mud bricks, which were originally oval-shaped mud lumps.
Toward the end of the 4th millennium the flat rectangular mud brick, formed in a wooden mold, came into general use.
Stone masonry served as a foundation, and alternating courses of mud bricks and dry stone formed the walls.
Because of the material’s potential and durability over these thousands of years, its use has been developed in whole villages of the East from Persia to North Africa.
flickr.com/manna4u, CC BY-NC-SA 2.0
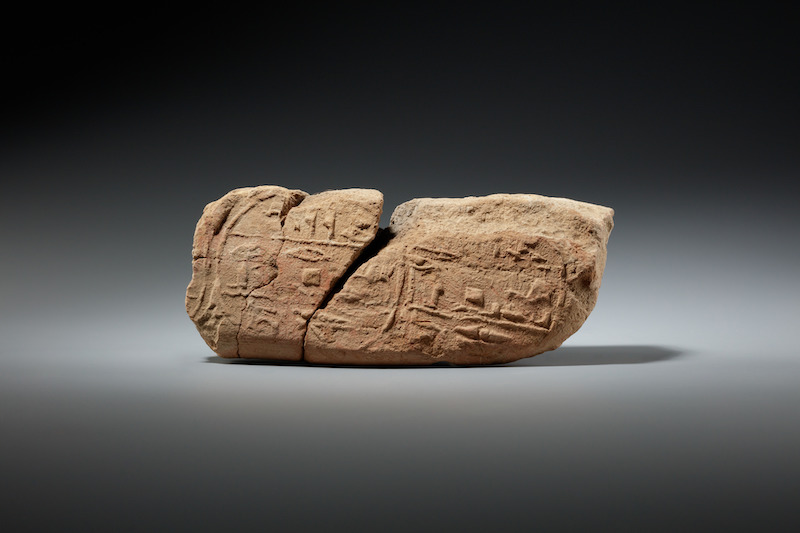
Bottom left: Stamped Mud Brick with the Name Min. New Kingdom, 1479–1458 BCE
28.3.31 / The Metropolitan Museum of Art
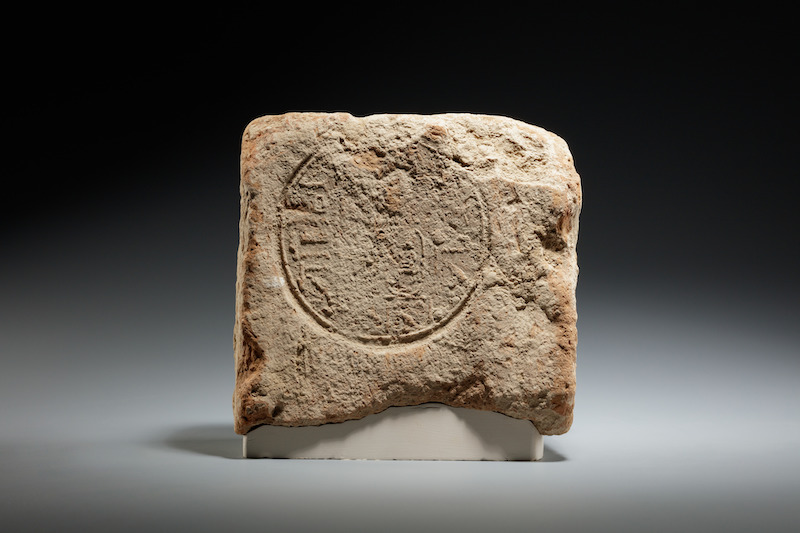
Bottom right: Mud Brick Stamped with the Name and Titles of Senenmut, New Kingdom, 1479–1458 BCE
28.3.31, 28.3.32 / The Metropolitan Museum of Art
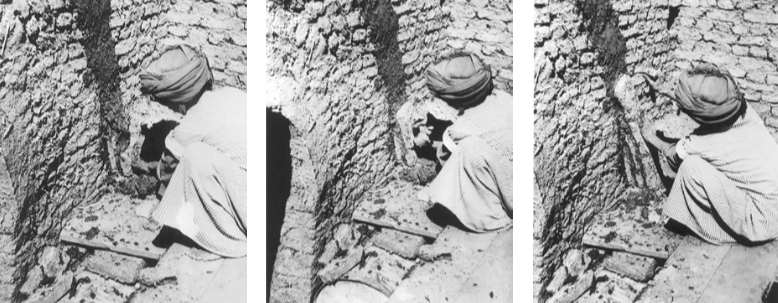
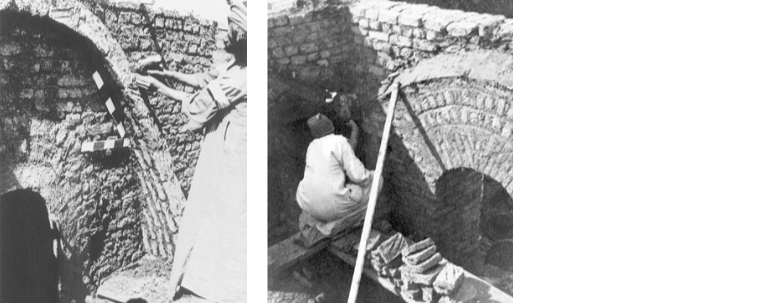
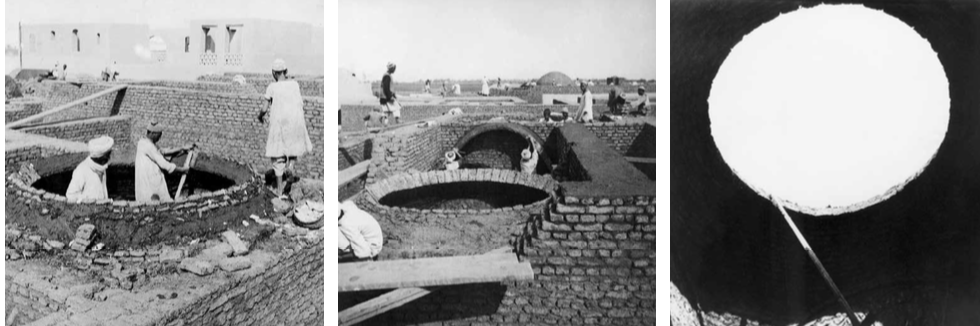
How are they built? The ancients gave parabolic vaults the profile of a catenary curve in which the tensile stresses are annulled, working only under compression. Normally, the vault in peasant houses is built by two masons standing on a couple of planks laid across the side walls and close to the end wall outlining, by plastering handfuls of mud onto this end wall, a perfect parabola with its ends set upon the side walls. Then, with the adze they trim the mud plaster to give the curve a sharper outline. The masons are then ready to lay the special bricks used for vaulting. These measure 25 × 15 × 5 cm [10×6×2in] and because they are laid end to end, the thickness of the vault will be 15 cm [6 in]. In order to increase the adhesion of the bricks in situ during construction relative to their weight, they are made with two grooves running diagonally from corner to corner. These work by suction, keeping the bricks in place until one course is completed. Calculations show the sliding stress for a brick at the most precarious position at the crown to be 0.01 kg/cm² [20 lb/ft²], which the earth mortar can take easily, even without the suction grooves.
With a mason standing at each side of the vault, the first brick is stood on its end on the supporting side wall, and hammered well into the plaster. Each mason then places a little wedge-shaped mud packing against the foot of his first brick, so that the next course will lean slightly against the end wall. In order to break the line of the joints between the bricks the second course is started with a half brick, on top of which is placed a whole brick. If the joints are in a straight line the strength of the vault is reduced and it may collapse. More mud packing is put at the foot of the second course so that the third course will incline a little more from the vertical. In this way the two masons gradually build the successive courses out, each one resting a little higher round the outline of the arch, till the two curved lines of brick meet at the top. As they build each complete course, the masons insert solid packing such as stones or broken pottery in the gaps between the bricks composing the ring (in the extrados of the vous-soirs). When the first complete parabolic course of bricks has been laid in a vault of 3 meters [10 feet] span, it will be six brick thicknesses long at the bottom and only one brick thickness at the crown and so will be leaning at a sufficient angle against the end wall thus presenting an inclined plane to lay the succeeding courses upon, giving the bricks plenty of support; this inclination, even without the two grooves, stops the brick from dropping off, as a smooth brick would if laid on a vertical face.
Because of the material’s potential and durability over these thousands of years, its use has been developed in whole villages of the East, from Persia to North Africa
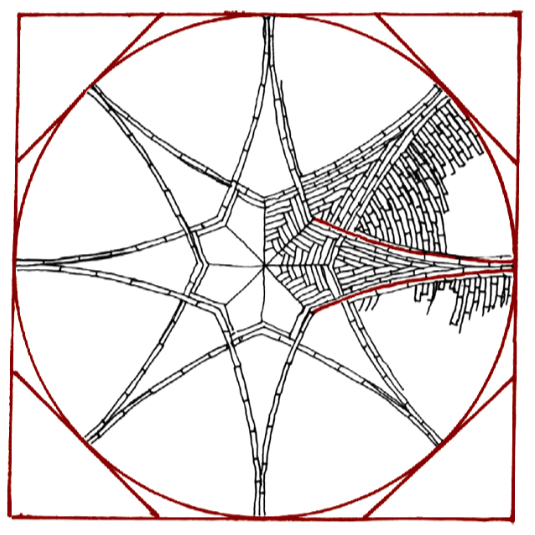
It is not only in the tracing of the catenary curve that the mason displays his skill, gained through much practice, but also in maintaining this curve as each successive parabolic ring is built. The success of the vault depends upon the skill of the masons. However, no matter how skilled the mason may be in drawing the catenary curve, the architect would be well advised to use a template with the exact parabolic curve against the end wall. The exact geometrical shape of the catenary curve can be obtained simply by putting three nails into a large board. So where the span of the vault is 3 meters [10 feet] the height of the vault will be 1.5 meters [5 feet] plus 15 cm [6 in]. A chain is then hung from nails A and B so as to exactly touch nail C. The curve of the chain is then marked on the board so that when the board is inverted we have the perfect catenary curve from which to cut the template. A and B define the span of the vault; D and C define the height of the vault.
Ranges and limits for vaulting
Vaulted roofs impose certain limits which are not encountered when designing flat roofs. Firstly, the resistance of the material, particularly mud brick, exerts lateral thrusts on the load-bearing walls, so structurally this needs to be considered in the design. Secondly, when the span is increased the height of the vault or dome rises creating a problem of levels in the architectural design when roofing several rooms of different sizes in the same house. There are several ways of reducing the span of the vault without reducing the felt width of the room below. The following examples show various ways in which vaults, domes and arches can be combined to achieve this purpose:
a) A series of side-vaulted recesses built transversally, one after another along the side walls with the main vault built longitudinally on top of these recesses. In Sarvestan (south of Shiraz, Iran) side-vaulted recesses are set laterally with a longitudinal vault on top.
b) A series of transversal arches with a convenient distance between them to receive transversal vaults. At the Ukhaider Palace in Iraq a beautiful example of the arch and vault can be found, the arches set a convenient distance apart to carry the lateral vaults.
c) A central dome with one or more recessed vaulted īwāns leading off it.
d) Pillars subdividing the internal space, the roof being formed by a combination of vaults and domes.
Voyage en Perse de mm. Eugène Flandin et Pascal Coste / The New York Public Library
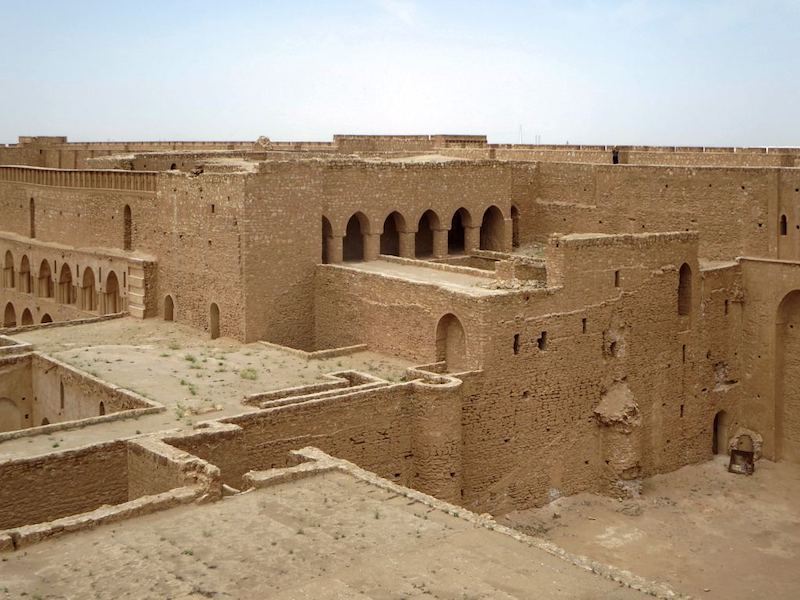
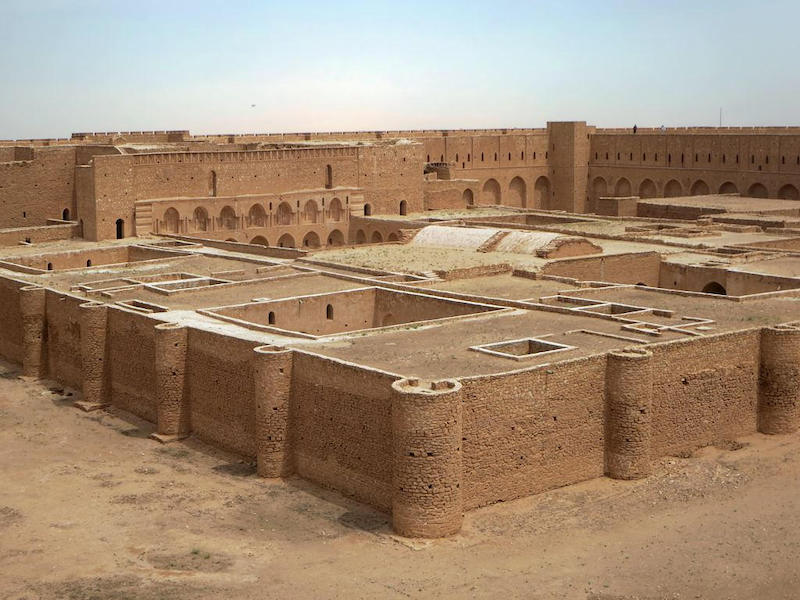
Below: Al-Ukhaidir Fortress of the Abbasid-era. Iraq, 2016
David Stanley, CC BY 2.0
These examples are an illustration of the fact that an architect has plenty of scope to use his imagination not only in the roofing of modest mud-brick peasant houses but also in more elaborate designs. Structurally speaking, however, there are limits to the spans that can be covered with a vault or dome, especially when using mud brick. The usual span of a vaulted room in mud brick is 3 meters [10 feet], corresponding with the span in more conventional village housing where 4 meters [13 foot] wooden beams are used to construct flat roofs.
It is interesting to note that this measurement dictated the size of many of the internal furnishings, even the width of the looms used to weave the floor rugs.
When using mud brick it is not only the area of the space to be roofed that affects the span of a vault or dome, but the prevailing climatic conditions. If the vault or dome is exposed to rain the plaster used for rendering must be stabilized, either with bituminous emulsions or cement. For instance, houses or farms built on the edge of the desert but close to vegetation are exposed to nightly dew caused by the band of humid air above the cultivation being blown over the dry desert where it is cooled. This cooling causes condensation to form on the surface of the mud-brick vaults, wetting the shell, which is then dried by the mid-day sun. This constant wetting and drying is more harmful than rain, and the use of stabilizers becomes implicit.
However, if this is beyond the reach of the poor peasant, the same situation can be countered by using fermented straw and cow dung with mortar for plastering. At the same time satisfactory results can be achieved by reducing the maximum span of the vault to 2.5 meters [81⁄4 feet] and that of the dome to 3 meters [10 feet]. To compensate for these reductions a dome and vault can be combined with these dimensions to cover the same room.
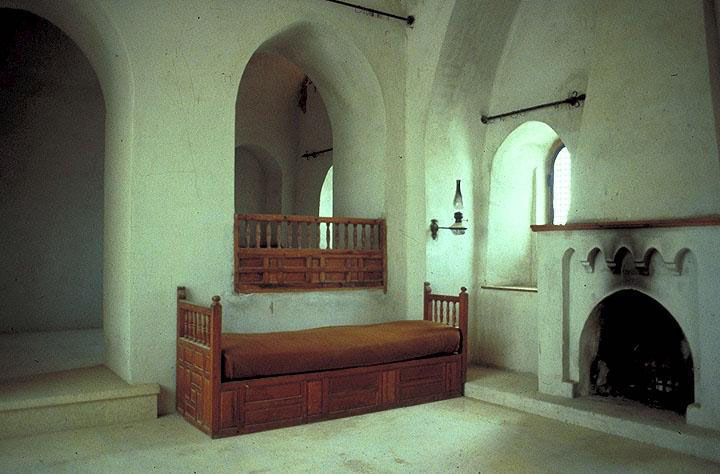
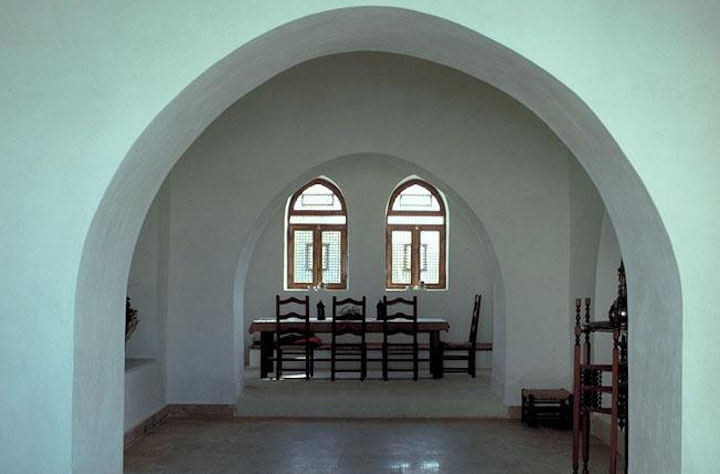
Let us return to the construction of articulated roofs. In mud-brick housing the concept of the reception room or qā‘a suits an articulated space allowing the roof to be a combination of vaults and domes. In an Arab house, the qā‘a is traditionally composed of a durqā‘a or central area with an īwān or recess off it. Here the roof is often composed of three elements, the vault, the arch and the dome, and is particularly suited to mud-brick architecture.
In this chapter we have been dealing mainly with peasant houses where the building medium is mud brick, allowing an unlimited supply of free roofing material, and thus removing the major technical and financial obstacles which have so often faced the peasant in the recent past. However, these techniques are not limited to the use of mud brick and can safely be applied to stone or baked red brick when a more sophisticated building is required. In the Ctesiphon Palace in Iraq, the central hall is 25.5 meters [84 feet] wide, 43.5 meters [134 feet] deep and is roofed with a catenary vault, 37 meters [120 feet] high. In a vaulted room the wall and roof stresses are almost continuous, creating an aesthetically pleasing feeling in a man-made space. In vault structure drawing, the lines flow harmoniously up and down with no abrupt change or break as in the case of a flat roof. The form is forcibly commensurate with the forces acting upon it, giving it truth which is a precondition for beauty.

Library of Congress
The arch is an integral part of roofing when one uses combinations of vaults and domes since it not only gives additional strength to the overall structure but provides the necessary support on which to set a vault or dome when used to articulate the internal space.
It should be noted that the inclination of the vault [detailed above] has to be reduced by the mason redressing the rings of the vault as he goes on little by little, until he lays the last ring very close to the vertical, to allow for the use of the shell of the vault as centring for the arch. The arch in this case will be built of two rings of brick placed vertically on the shell. An example is a room with the design concept of the qā‘a, with the square durqā‘a, 3 meters [10 foot] span, covered with a dome and a vaulted īwān off it with 2.5 meters [81⁄4 foot] span. The arch serves two functions: one is to redress the squareness of the durqā‘a by compensating for the regression at the end of the vault covering the īwān (which leans away from the vertical). This is achieved by having the arch projecting over the end of the vault at the crown so that the arch becomes flush with the wall surface giving the durqā‘a a perfect square form. The second function is to strengthen the shell of the vault to support the dome. The arch sitting on the vault is two rings thick and two bricks wide. In this specific case, no wooden centering is needed with the shell of the vault performing its function.
The form is forcibly commensurate with the forces acting upon it, giving it truth which is a precondition for beauty
There are other ways of using the arch in building vaulted roofs where centering is necessary, for example when one uses a series of domes or transversal vaults to roof the same room.
The brick — the basic unit
Bricks come in various sizes ranging from 23 to 40 cm [9 to 153⁄4 in]. In Сentral Africa conical bricks are made. The larger sizes of brick are used for building walls in buildings designed to have flat roofs, while smaller bricks, which provide greater ease of handling, offer a greater scope for articulation of walls and pillars in domed and vaulted buildings. In the case of mud-brick architecture with vaulted roofs, two sizes of brick are particularly suitable for wall structures, namely those of 25 × 12 × 7 cm [10 × 43⁄4 × 23⁄4 in] and 23 × 11 × 7 cm [9 × 41⁄2 × 23⁄4 in]. For vaults, bricks of 25 × 15 × 5 cm [10 × 6 × 2 in] should be used. Bricks used for building vaults and domes are made by mixing 120 kg [265 lb] of straw per cubic meter of earth. It is the addition of straw which allows the bricks to be lighter. Straw, when mixed with earth and kept wet for two or three days secretes lactic acid, forming a natural stabilizer. The earth molecules will vary from one site to another; some soil has fine granules and some coarse like sand. The ratio of the coarse to the fine may vary between one third to two thirds by volume.
© S.S. Damluji, 1975
Right: A selection of diagrams used by Hassan Fathy to show brick-course patterns and arrangements.
Usually one surface of the vault brick is marked with two parallel diagonal grooves drawn with the fingers from corner to corner of the largest face, thus enabling the bricks to stick to the muddy surface by suction.
The amount of straw added in the mix is nearly double the amount of straw in the wall type of bricks, with earth. Where the soil is sandy, the sand is used as a substitute for straw. Domes can be built using either type of brick.
Analysis of the material
Suitable soils
Soils are tested and a mechanical analysis is made. A thorough study of the characteristics of the soil available is necessary before accepting or rejecting any soil for brickmaking.
A good brick is usually made with clay containing the amount of sand just sufficient to eliminate cracking when drying. Although the addition of sand to natural clay soil weakens its strength, and clay is normally added to sandy soils to increase their strength, yet sand reduces the shrinkage and cracking that might occur in drying the mud bricks.
Soil favorable for brickmaking should be free of loam and organic matter. The most favorable soils may consist of 60–70 per cent silty clay and 30–40 per cent fine sand.
Moisture content
The optimum amount of water is a critical measurement of good brick quality, as it is ensured by the moisture content. Higher moisture content than optimum is better than lower, as the mud can be filled and allowed to dry until the most desirable consistency for molding is reached. Yet, too much moisture in the mix will dry out in the completed brick, leaving voids that weaken the brick’s compressive strength, allowing further absorption of moisture which affects its dry density.


Aga Khan Trust for Culture, CC BY-NC 4.0
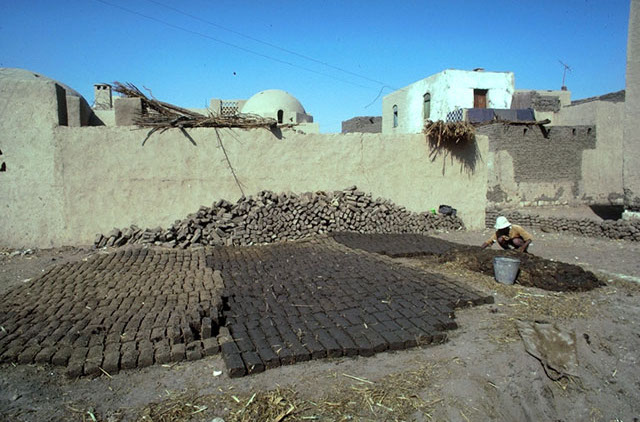
This normally takes place in the dry season, generally after the harvest when there is an abundant supply of straw and the sun will readily dry the bricks. To facilitate control, dried bricks have to be stacked in regular piles, two bricks wide, eight bricks high and sixteen bricks long. In this manner it is easy to calculate the number of bricks available.
The method of making mud bricks
The art of making mud bricks is an old traditional craft and involves several distinct operations. The bricks are usually of a set size and consistency, so that [they become] a dependable unit, incorporated in planning.
Ordinary earth from the site is used; the brick masters take the earth from excavations for the house on the same land, thus it is economical, and obtain additional earth from a pit they dig nearby. Sand is brought from the desert if the soil isn’t sandy. The earth and sand are mixed in the proportion of 1:1⁄3 by volume. This mixture prevents the brick from shrinking excessively (earth shrinks up to 37 per cent after drying) and proves economical with the use of straw.
When the brick mixture is fermented, it is carried in baskets to the molding place where the brickmaker works forming a mud heap near him. Wooden frames are used as small hand molds, which are simply open rectangular frames with no top or bottom. The brickmaker first covers the ground with a thin layer of separated grain husks or chopped grain and straw, puts the molding frame flat on the ground and throws a quantity of the mud–straw mix into the mold, beats it into the corners with his bare hands and scrapes any surplus off with a small straight edge. He lifts the frame with a swift movement, leaving the fresh brick on the ground, which has been strewn with sand and straw. Molding row after row in this way, the brickmaker produces about 250 bricks an hour.
The optimum amount of water is a critical measurement of good brick quality
This method means that the mixture must be very wet, so that the mold can slide off by raising it lightly without having to press on the mud at all.
The freshly molded bricks are left in the sun to dry, being turned on edge after three days and taken off to the brick stacks six days later. There they remain as long as possible to dry out thoroughly before being used in building.
They should be cured for no less than 30 days under average hot, dry climatic conditions until they have reached a constant weight before using, usually to equalize the drying and to avoid the cracking and shrinkage of these bricks.
Mortar
In vault construction, mortar has to be sticky in order to keep the brick in position while construction is under way.
1. The mason roughly outlines the parabola with mud plaster on the end wall. The plaster is trimmed with an adze.
2. The first brick is tapped against the end wall. The second course starts with a half brick to break the line of mortar joints.
3. The third brick finishes the second course. The third course leans more acutely from the vertical.
4. Mud is put against the third course. The first ring is complete and the vault has a thickness of six bricks at the bottom and one brick at the top.
5. Vaults against the wall.
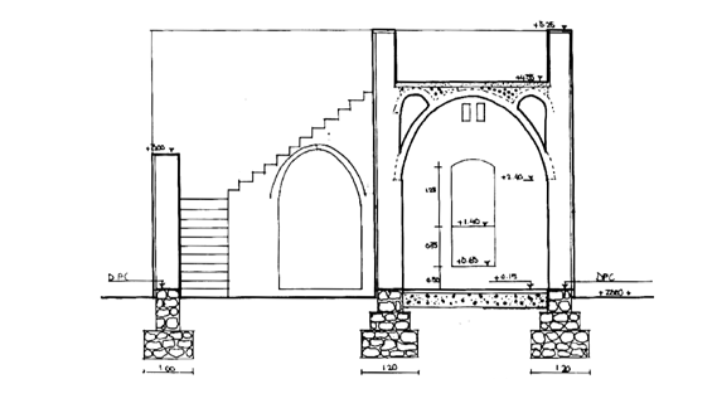
Right: Section illustrating how the vaulted roof could be levelled flat to allow for another storey. On the declining sides of the vault are two smaller vaults. The rest of the area is filled with rubble.
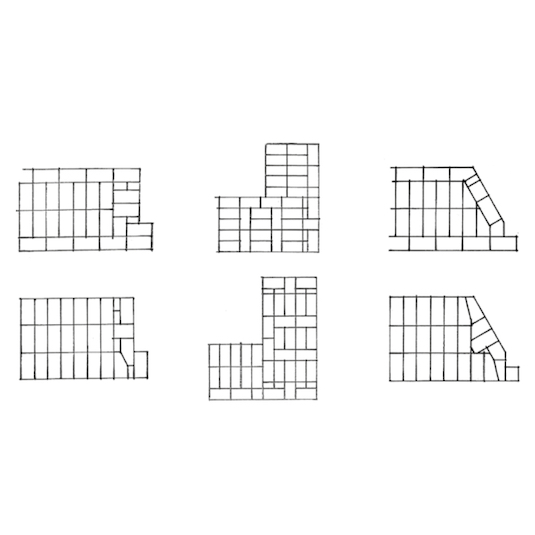
The English size of brick, namely 25 × 12 × 7 cm [10 × 43⁄4 × 23⁄4 in], or Egyptian bricks of 23 × 11 × 7 cm [9 × 41⁄2 × 23⁄4 in], which were used in the building of Gourna, suit the variation in wall thicknesses and the size of pillars necessary to carry vaulted roofs, and enable them to withstand the lateral thrusts exerted by vaulted roofs. The above diagrams show the variety of ways in which the bricks may be bonded ensuring that the walls and pillars have the strength required.
Foundations
The area marked for foundations is dug out at least 10 cm [4 in] wider on the top than at the bottom to allow for collapse of sides into the trench.
Before the foundations are laid, the builder checks that the bases of the foundation trenches are level, by using wooden posts and a spirit level.
Soil tests for stability are essential prior to building. One unstable type of soil is clayey soil which normally has a high moisture content and is liable to give uneven pressure, or even to rise with the absorption of water, which can cause damage.
The trenches for the foundations are dug out about 45 cm [18 in] deep and slightly wider than the planned thickness of the wall. Whatever earth is dug out is carefully gathered at a spot where it is mixed with burnt lime and water into a soft paste. A layer of about 15 cm [6 in] of this paste is placed in the trench and coarse stone ballast that has been brought by donkeys from the nearest quarry is thrown into it. With one layer of stones in the trench, a second layer of mud paste is worked over the stones, ballast follows, and this is repeated until the trench is filled. In due course within three to four weeks these foundations would have been sufficiently set to begin building the walls as the lime–mud–stone mixture becomes as hard as rock.
After setting out foundations
Ditches are dug 1.1 m [31⁄2 feet] deep, making the width of the ditch larger than necessary to allow for inaccuracies, using level stakes 25 cm [10 in] high. Concrete is poured into the ditch, and levelled to stakes, allowing it to dry for approximately a day, then 5 cm [2 in] of sand is poured over.
For each successive course of red brick (fired brick as opposed to sundried), string guides and plumb lines should be used to ensure that walls line up horizontally and vertically.
Walls
After five courses of red brick, the wall is stepped in to 60 cm [231⁄2 in] width where vault and dome thrusts do not apply, as the rest of the wall remains 80 cm [311⁄2 in] in width.
After the 10th course of red brick, cement over the last course is laid and bitumen is poured over it and sand is sprinkled. When the bitumen has dried, two more courses of red bricks are added. Then the mud-brick walls are built, ensuring each successive course bonds over the last, to avoid long vertical cracks.
Rammed-earth walls (pisé)
This method is usually used for walls surrounding yards, greens, gardens, etc. The tallest walls in pisé are well over 6 meters [20 feet].
Earth is moderately wetted and mixed with chaff (separated grain husks or chopped grain and straw). Laborers or builders tread it barefooted, kneading it into a plastic mass. When a sufficient quantity has been prepared, it is carried to the building site and thrown in lumps to the builders, who catch it and place it in position. The building line is marked with a string and the clay lumps are placed on the properly set foundations. The clay lumps are shaped freehand into a course of about 40 cm [16 in]. From time to time the builder draws a straight edge along the growing wall and checks its verticality with a plumb line. When a course is finished the builder smooths the surface by rubbing it with a trowel; after two or three days, when it has properly hardened, another course is laid until the desired height has been reached.
Aga Khan Trust for Culture, CC BY-NC 4.0
After bricklaying all the walls, they are rendered with a coat of mud–straw mix, often enriched with some lime to make it insoluble after setting. The rendering is done with a steel trowel, and smoothed with a wooden float. The workers use a movable trestle to reach the higher parts of the walls.
Whitewash
This recipe for making whitewash was suggested by Hassan Fathy when we were thinking of restoring some houses in his built village, New Gourna:
A tin of live lime — about 18 litres [4 gallons] dissolved to the consistency of a paste. Add 1 litre [1⁄4 gallon] of oil and 1 spoonful of salt; [and] the blue stone crystal they call in Egypt a “blue Zahra” — flower — the bluing agent they use in the wash for whitening.
The mixture when ready is used to paint the mud, normally using big pieces of cloth rather than brushes.
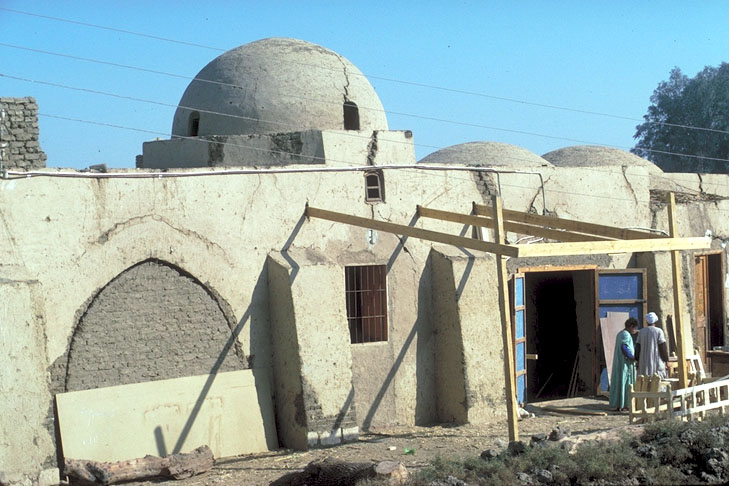
Domes
There are three kinds of dome: the Byzantine set on pendentives, the Sassanid on squinches and the conical dome.
The Byzantine dome
For peasant house building, the Byzantine dome is appropriate for roofing ordinary living rooms, because the rise of the curved part above the vertical walls of a room is small, allowing for levelling at the top and the addition of another floor. This levelling can be achieved by four fan-shaped squinches which rest on the side walls and on the curved part at each corner.
The Byzantine dome is formed by concentric courses of bricks supported by pendentives. Here, the area of the space to be roofed is a square. The curvature of the dome has half of the diagonal of the square as a radius, thus the theoretical base of the dome will be the circumscribed circle around the square plan of the space below.
To explain, suppose that we draw the total sphere with a radius of half the diagonal of the square, thus parts of the sphere will project over the walls of the house. These are sliced off vertically leaving four semicircular vertical walls which will have the radius of the inscribed circle, joined by four spherical triangles resting between each two semicircular walls. It is these triangles that are called the pendentives. The roof is finished by the curvature of the dome continuing above the pendentives until the sphere is completed. If it is necessary to raise the height of the enclosed space, this can be achieved by putting another shell on top of the pendentives, with the radius of the inscribed circle, thus having two curvatures. (The radius of the lower curve will be that of the inscribed circle, while the crown of the dome will have the radius of the circumscribed circle of the square space being roofed.) Another way to achieve the necessary height of the enclosed space is to have a cylinder resting on the pendentives covered by a dome.
To construct a Byzantine dome, a wooden post is driven into the ground in the middle of the room with its top right at the center of the dome. A guide stick with a length equal to half the diagonal of the square is freely attached to the top of the post so that it can swivel round forming a guide to ensure that the consecutive courses point to the center of the sphere.
The Sassanid dome
Again the plan of the enclosed space to be roofed is square. It differs from the Byzantine dome in that it has as its radius the radius of the inscribed circle of the square being roofed. Generally the square of the room is transformed into an octagon by four squinches; these are semi-domes set at the corners of the square allowing it to become an octagon. The dome then sits on this octagonal base. This configuration has a symbolic value, with the square being transformed into an octagon and the octagon into a circle, expressing movement upwards with the eight sides of the octagon symbolizing the eight angels carrying the throne of God.
Sassanid domes are used in mosques and mausoleums, in living rooms or reception rooms as in the qā‘a of a peasant house, as well as to cover important public buildings such as village halls, schools, etc.
Squinches
For small spans of up to 4 meters [13 feet] the squinch is spherical, having the form of half a dome resting on the walls bridging the four corners and creating the transfer zone for the dome. For larger spans the squinch has to be subdivided into several smaller squinches, and corbelled to take up the thrust.
Pendentives
These are spherical triangles formed between the supporting arches of the dome. Each brick of the pendentives is placed with the use of the string from the center post, so that the first brick to be laid at the bottom will be in the far corner of the dome, whilst every successive course of bricks laid over it will project slightly out towards the center of the dome. At the point where the pendentives reach the same height as the top of the arches, the first complete circle of the dome will be built.
The conical dome
In this type of dome the voussoirs are laid in a horizontal plane with the successive courses of bricks corbelled one on top of another. While the actual mode of construction of a conical dome is easier than the Byzantine or Sassanid, the form of the structure does not reconcile the forces which are acting on it, thus limiting the span of the room to be covered. Further, the plan of the space being roofed has to be circular in the corbelled system, an inconvenience for living arrangements. Although this kind of dome was used and is still being used by considerable numbers of rural people in northern Syria (and the Trulli dry stone conical domed huts in Apulia, southern Italy), it does not fit into the policy advocated here for solving the problem of housing in developing countries.
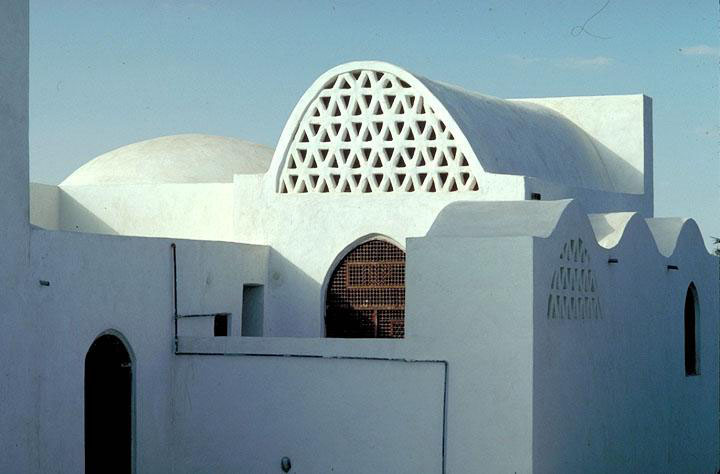
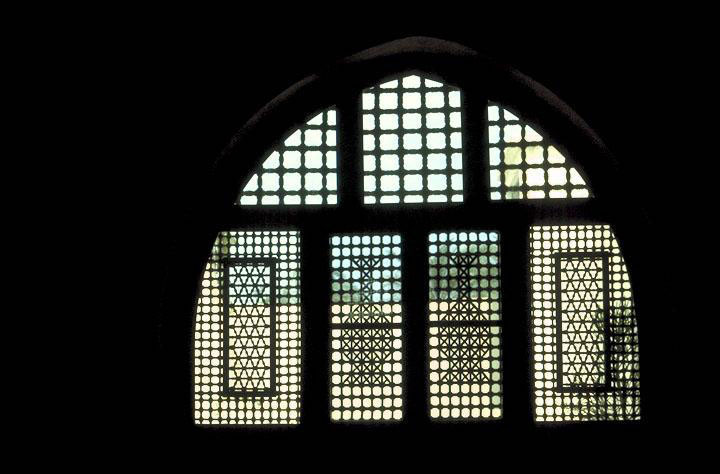
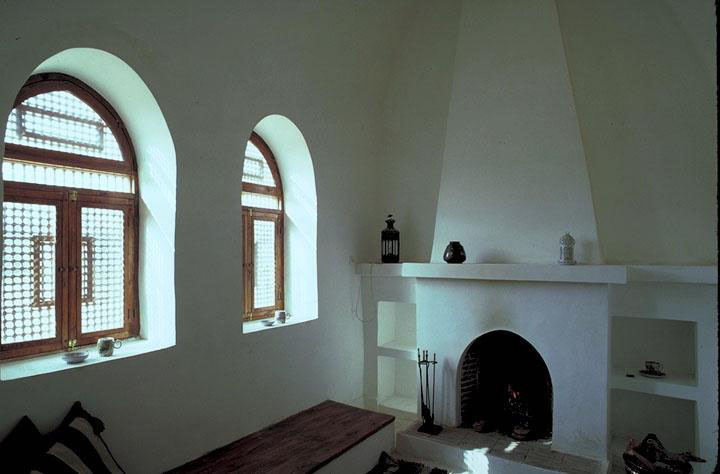
In this chapter we have been talking about the construction of vaulted roofs. Now let us look at the working drawings. In the design of rooms with vaulted roofs we have pendentives, parabolic vaults, and squinches, all with specific forms and dimensions. These vaults and domes sit on vertical walls in which there are doors and windows, so that the springing of these vaulted elements should lie on top of the lintels of these openings. This is easily achieved if one first draws the dome and the vault and then continues downwards with the vertical walls. This enables one to insert the openings for the doors and windows below in the appropriate positions. Further, after the completion of the curved shell one can insert smaller cupolas of colored glass, allowing the enclosed space communication with the sky.
Aga Khan Trust for Culture, CC BY-NC 4.0
For the construction of roofs and ceilings there is one case where mud is used for flat roofing, particularly on the slopes of the Zagros Mountains where a mixture of mudstraw and some lime well worked and rather soft is spread over the ceiling boards or braided reed mats in many layers. Each layer is given some time to dry, after which it is compacted with a rolling stone. The spreading of these layers continues until the roof reaches a certain thickness of 25 cm [10 in] (as in Isfahan) or 50–75 cm [20–30 in], depending on the proportion of straw in the mud–lime mixture.
For maintenance precautions, after each rain, the roof has to be compacted with a stone roller, otherwise it is liable to develop cracks while drying.
Great care is taken during the spreading process that the roof is divided into sections 3–3.6 meters [10–12 feet] wide by molding the mud mixture into channels, slightly depressed in the middle of the roof, and deepening towards the edges, where they end in wooden spouts.
During the construction of the roof, abundant amounts of salt are strewn on the braided mats, mixed with the mud, to keep insects (white ants and borers) away.
Mud roofs have the advantage of keeping the rooms cool in summer and warm in winter.
Staircases
Mud-brick staircases can be supported by vaults, the construction details for the vault being similar to those of the īwān in the qā‘a concept, where the courses are redressed so as to bring the end of the vault nearly vertical to allow for the construction of an arch using the shell of the vault as centering. The arch projects over the end of the vault to compensate for its regression and forms a crescent to support the staircase. Naturally, in the case of vaulted roofs for housing, rainwater has to be drained off by levelling the space between the vaults and domes, thus allowing the water to drain into gutters. Stabilizers prevent the rendering from cracking, which can occur when it dries after rain, and prevents leaking. The curved surface also helps to shed the water immediately.
Mud roofs have the advantage of keeping the rooms cool in summer and warm in winter
Protection
Mud-brick structures are vulnerable to damage by dew, rain and melting snow. Nor do they take kindly to the occasional flood descending upon them from the neighboring environment.
Let us consider humidity. This is the greatest enemy to mud brick since the structure is continually wet and in turn is dried by the midday sun. For protection against rain and dew it is often enough to stabilize the plaster, by adding bituminous emulsions, or to stabilize the actual bricks. Vaulted roofs require more care than walls, since they present a large horizontal surface area, particularly in high-rainfall areas or where there is an annual snowfall such as in New Mexico. One way to protect these shells is to cover the surface with damp-proof sheeting, held in place by chicken wire and then sprayed with foam concrete. Exposure to moisture can also originate from seepage, by capillary action from the ground. This can be prevented through the use of stone foundations, the stone continuing to the level of the ground floor. A damp-proof course of asphalt (tar) is then laid before commencing the first course of mud bricks for the walls.
Stabilizers
Humidity and the weather considerably affect mud bricks, making them irregular in shape. The addition of stabilizers ensures a better brick shape.
Stabilizers also provide greater durability, particularly for sun-dried bricks.
Expensive methods of stabilization are unnecessary: once a sufficiently strong brick has been made it is better left alone. Yet the effects of damp must be prevented to keep mud bricks dry. Dampness is the greatness enemy of mud brick. The mud gets wet from rain, dew, capillary attraction out of the ground, or simply from the humidity in the air as in coastal areas — Lebanon, for example.
To circumvent the effect of damp from below, a damp-proof course is indispensable, while the bricks may be protected by various methods:
1) It has been observed that bricks made according to the peasant fashion in Egypt, Sudan, Syria, and Iraq, by which straw and cow dung are added to the mud and left to ferment for a long time, seem to resist water well. The cow dung is gathered and piled up individually in heaps arranged in circular form on the land so that it dries out and ferments while it is exposed to the sun for several days before it is used.
2) Straw is often used as it is the cheapest and most available satisfactory stabilizer that holds the brick together during the initial drying. The amount of straw added to a mix should be no more than 2.5 per cent by weight. In cases where an excessive amount has been added, the brick tends to weaken and its compressive strength is reduced.
3) Bituminous emulsion is used sometimes in place of the straw, yet it must be especially designed for high efficiency in mixing with the fine soil particles to make good stabilized bricks. This emulsion serves as a water-proofer to the bricks. No more than 3–5 per cent by weight of bitumen should be added to stabilize the soil, as higher percentages weaken the adobe brick.
4) The use of both the straw and the bitumen together has proved to be more satisfactory, and it is found to be adequate for any load bearing commonly required in structures for dwellings.
The percentages recommended in adding straw and bitumen to soils, favorable for brickmaking in the production of stabilized adobe bricks, are 2 per cent straw and 3 per cent bitumen.
Thermal insulation
Should the climate call for thermal insulation, this can be achieved most effectively in the system of roofing with vaults and domes. For instance, in a peasant house which employs the qā‘a system the vault roofing the īwān can be levelled up to the level of the crown of the dome roofing the durqā‘a by having a second smaller vault supported by the initial vault covering the īwān and the end wall on the other side. This system allows the dwelling to have a flat roof, or an additional floor can be added. In either case, the space between the horizontal flat surface and the curve of both the dome and the vault provides the necessary thermal insulation, as well as providing a relatively large space which can be used for storage.
In 1964, the Ministry of Science and Research in Cairo invited all the architects and engineers who were interested in peasant housing to build a model room in the grounds of the Research Center in Cairo. Of these, two extreme cases were constructed — one built in mud brick and the other in prefabricated concrete slabs. When these were evaluated from a climatic point of view, it was found that the air temperature in the prefabricated model was 11°C [52°F] higher than in the mud-brick model, in which the air temperature remained within the limits of the comfort zone.
The Peasant Bedroom
For a peasant bedroom in mud brick a convenient idea is to apply the qā‘a concept composed of a central square or durqā‘a having a 3-meter [10 foot] span and combine it with an īwān or recess with a 2.5-meter [81⁄4 foot] span leading off it. If the thicknesses of the walls of the room are 50 cm [20 in] then the jambs carrying the vault will have a thickness of 75 cm [30 in], reinforcing the structure.
The durqā‘a is usually square and will be covered with a dome, and the īwān or recess will be roofed with a vault. The domes will sit directly on the three walls and on an arch built on top of the vault using the shell as centering, joining on to the durqā‘a.
A dome is stronger than a vault but must sit on a square, which is not agreeable aesthetically. To give rectangularity, recesses are constructed off the square roofed with vaults. One large recess is provided for the bed with a span of 2.5 meters [81⁄4 feet], redressing the rectangularity of the felt space of the room. In addition, small recesses provide space for wardrobes, thus freeing the central part of the room and creating a more pleasant feeling within the space than an ordinary arrangement in which the bed and cupboards take up most of the room.
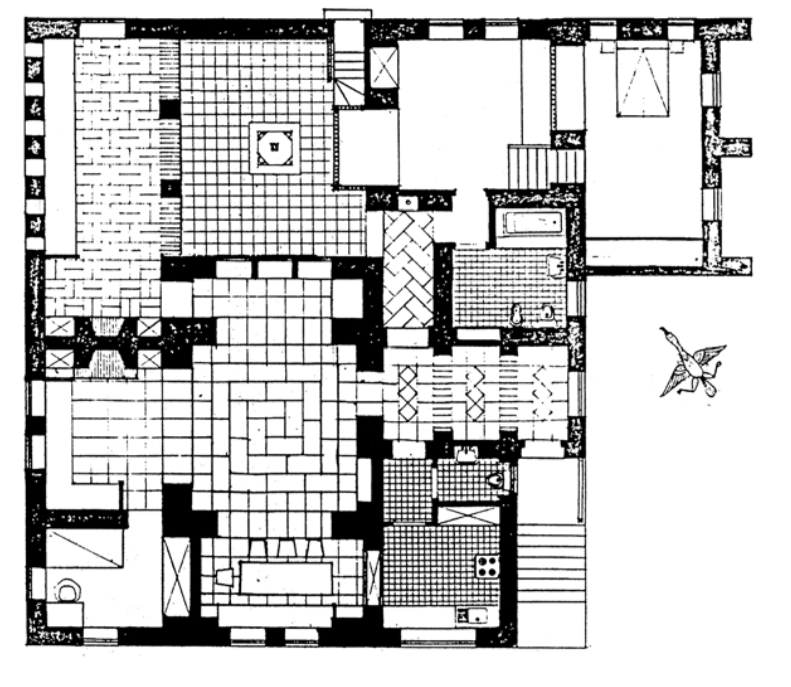
The design concept of the durqā‘a can be extended, allowing many desirable combinations as shown in the plans opposite.
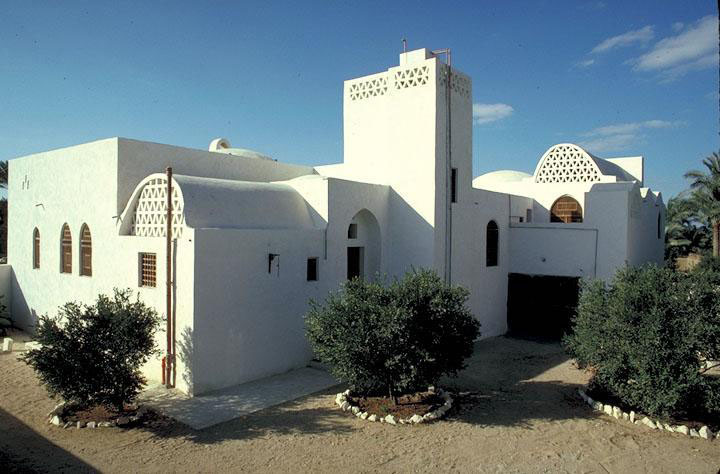
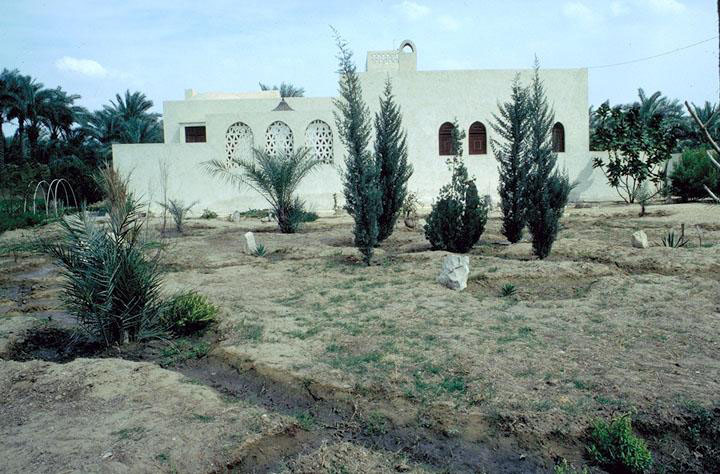
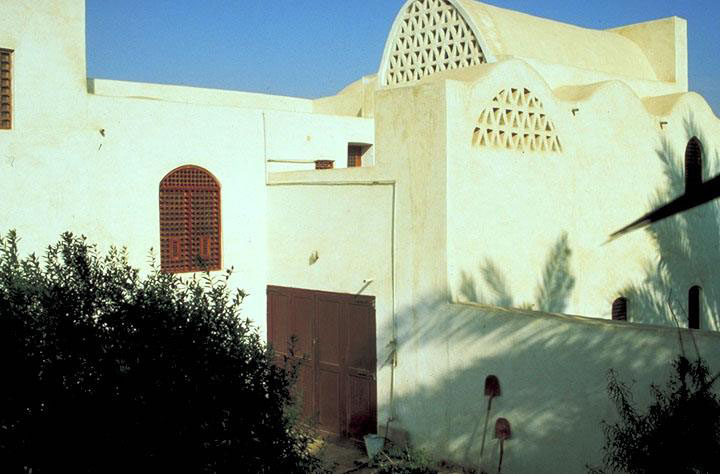
The following figures show the opportunities this design concept offers for variation in respect of the aesthetic values in configurations for a community. This concept is not limited to peasant houses but can be applied to more sophisticated villas built in mud brick, baked brick or stone. The plan for Sidi KrierSidi KrierTo Build a House: The House in Sidi Krier, pp. 292–295 [Hassan Fathy’s house] on the northern coast of Egypt shows the design of a coastal villa built in local stone found on the site.
Aga Khan Trust for Culture, CC BY-NC 4.0
The following figures show how the design would fit into various houses and how these plans for houses with vaulted roofs look.
The villa of Mr. Akeel Samy in the village of Dahshour, Giza, is built in stone and roofed with red bricks. The design of this house shows how the vaulting system lends itself to animating the interior of a house by having varying levels. The same concept can be applied even in America using suitable materials.
Stresses
When building small rural houses with one or two floors in mud brick, the minimum thickness of wall should be no less than 50 cm [20 in]. In such structures, the maximum stress to which each brick is exposed does not exceed 3 kg/cm² [6,100 lb/ft²]. Both in the walls and vaulted roofs the resistance of the brick is not less than 10 kg/cm² [20,500 lb/ft²]. So with this safety margin the architect can safely handle the structural problems. However, when designing larger buildings such as mosques, schools, community halls, etc. it is implicit that soil-mechanics and structural engineers are consulted.
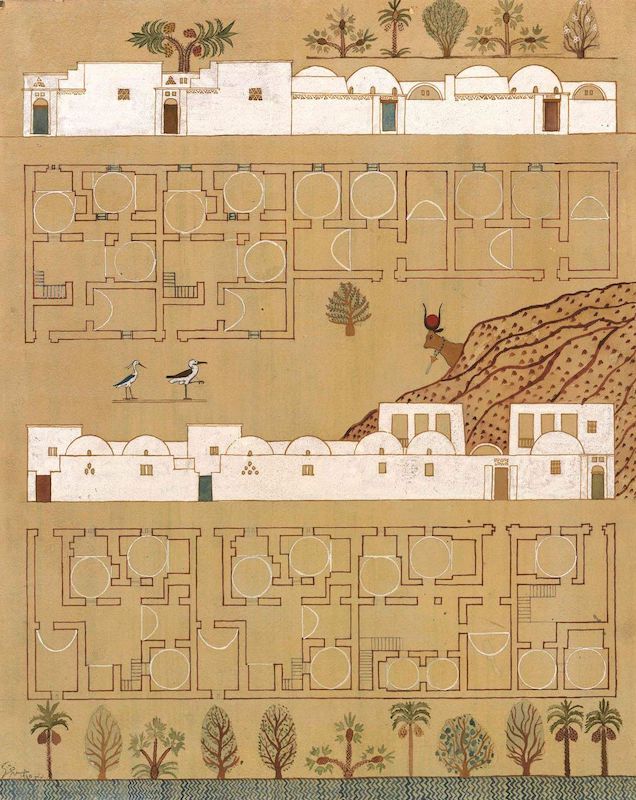
Five arrangements: The techniques of building vaults and domes in mud brick or stone set certain restrictions concerning the dimensions and arrangement of the rooms. These limitations identify the design concept, and a pattern develops naturally from a vaulted īwān and domed room to a house and then to a village.

1. Central room with dome. The qā‘a arrangement of the Arab house: the central room with a dome and an adjacent vaulted īwān. The addition on the left side is a patio with two vaulted īwāns.
2. The two-room arrangement: the īwān is used for sleeping and seating, with alcoves for storage or clothing.
3. The arrangement of units with the same structural technique in a house decides not only the form of the house but also that of the village.

4. A two-room arrangement with a hall and patio in two adjacent units.
5. A three-room arrangement with a patio.
6. A three-room arrangement with a patio and a courtyard.
The text presented hereThe text presented hereSalma Samar Damluji and Viola Bertini, Hassan Fathy: Earth & Utopia (London: Laurence King Publishing, 2018), 316-329. was originally written by Fathy over a period spanning from the late 1970s to the early 1980s. In 1984, we wrote and edited the text, adding the figures as numbered here and used where possible. Notes from earlier research (by Salma Samar Damluji) on vault and dome construction have been added in to supplement parts of the text where needed. Other published sources include H.E. Wulff, The Traditional Crafts in Persia, MIT Press, 1966, relating to material constitution and features or element of earth construction, to complement Fathy’s text. Illustrations provided in the original draft of the text by Hassan Fathy do not necessarily acknowledge the precise sources or published references that they came from; every effort has been made to locate the sources when some of these were used. All the drawings that were done in 1984 with Fathy were redrawn for this publication.
The text was published in the second issue of EastEast Paper in 2020